Some hints on using Wavesurfer
Contents
Wavesurfer is an easy-to-use acoustic analysis software package distributed for free by the Centre for Speech Technology (CTT) at the Royal Institute of Technology (KTH) in Stockholm, Sweden. There is a manual.
I highly recommend using the older version, 1.8.5. You can get it here.
Wavesurfer doesn't have to be installed; you just download it and unzip into a folder of your choice.
To do stuff with Wavesurfer, you either first use it to make a recording, or you open up an existing digital recording.
If you want to get yourself a microphone, I suggest getting the type that plugs into the USB port of your computer. These digitize the signal outside the computer, reducing noise considerably.
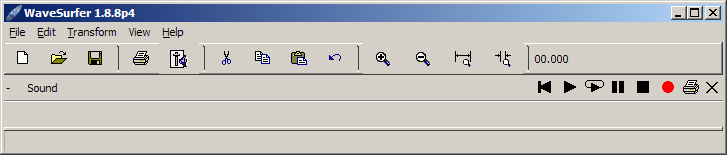
The Wavesurfer interface uses the standard tape recorder style buttons. (Red dot is record, right triangle is play, square is stop, and so on.) Try recording with the red button. If it works, move on to the next direction; if you're having trouble, click here.
Giving yourself enough time: if you're doing a recording more than ten minutes long, ask for enough time. Select File, SoundI/O, Record Time Limit, and enter the maximum number of seconds you need.
It might pay first to fix your copy of Windows so you can see the file suffixes. If you don't know how to do this, visit this page. Once you've done this, you can determine what kind of sound files you have, by looking at the suffix (.wav, .aiff, etc.). Wavesurfer opens various kinds of sound file.
To open a sound file in Windows, right-click on it and select Open With. Choose Wavesurfer, if necessary picking Browse to find where the program is (it will be on your CD drive, or if you downloaded it and installed it, in your Program Files folder).
Here's what the Wavesurfer interface looks like when you open up the program:
The one slightly counterintuitive bit in Wavesurfer is this: to get
started, you need to
right-click
on what you're recorded, as shown and select Create Pane. It
will give you the list of options, like:
What you pick will depend on what you're analyzing, but I recommend you always include a time axis. I like to pick all four of the above, then I save the configuration; see below for how to do this.
You can change the size of the windows by dragging on the edges with the mouse.
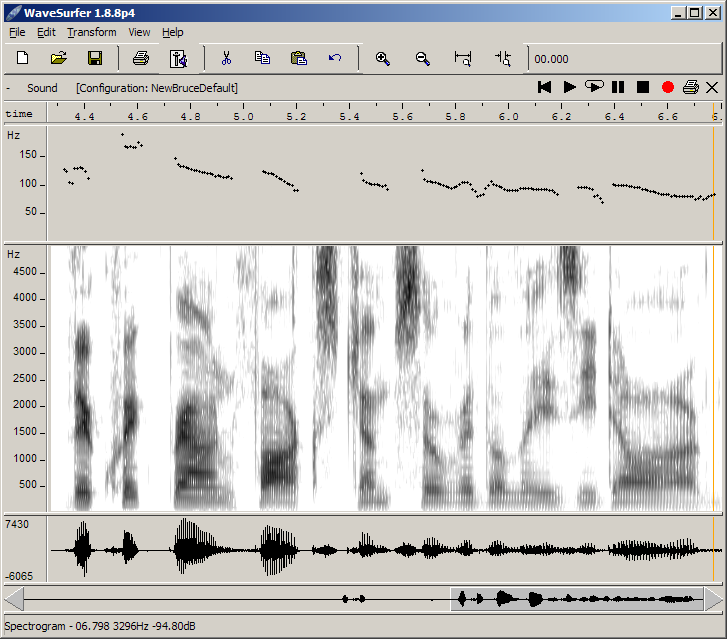
Here is an example of a full analysis in Wavesurfer; it has a time scale, pitch track, spectrogram, and waveform of me saying The quick brown fox jumps over the lazy dog.
Analysis -- a convenient shortcut
Right-click on the screen, select Apply Configuration then Speech analysis. This gives you a pretty nice setup that is especially good for measuring formant frequencies.
Often, pitch tracks are hard to interpret unless you stretch them vertically to show the pitch changes clearly. To do this, right click on the display and select Properties, then Data plot, find Plot value bounds, and lower the Max until it's just a little higher than the maximum pitch found in the recording. Then click Ok.
Likewise, spectrograms are often easier to read if you cut off the top
frequencies. I find it's useful to cut them off at 4000 hz if there
are no sibilants, and 6000 hz if there are. To do this, right click
on the spectrogram window and select Properties, then enter a number
(hz) for Cut Spectrogram At and click OK.
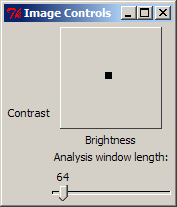 |
Wavesurfer also has a nice interface for adjusting the legibility of spectrograms. Right-click on your spectrogram and pick Spectrogram controls. Then you can drag the little black box to adjust brightness and contrast, and drag the slider to go smoothly between wide-band and narrow-band. |
Right click, then Create pane, then Formant plot. This gives you a spectrogram in which the formants are plotted fairly exactly in little colored lines. If you put the cursor on this spectrogram, then at the bottom of the screen will appear the values for F1, F2, F3, and F4.
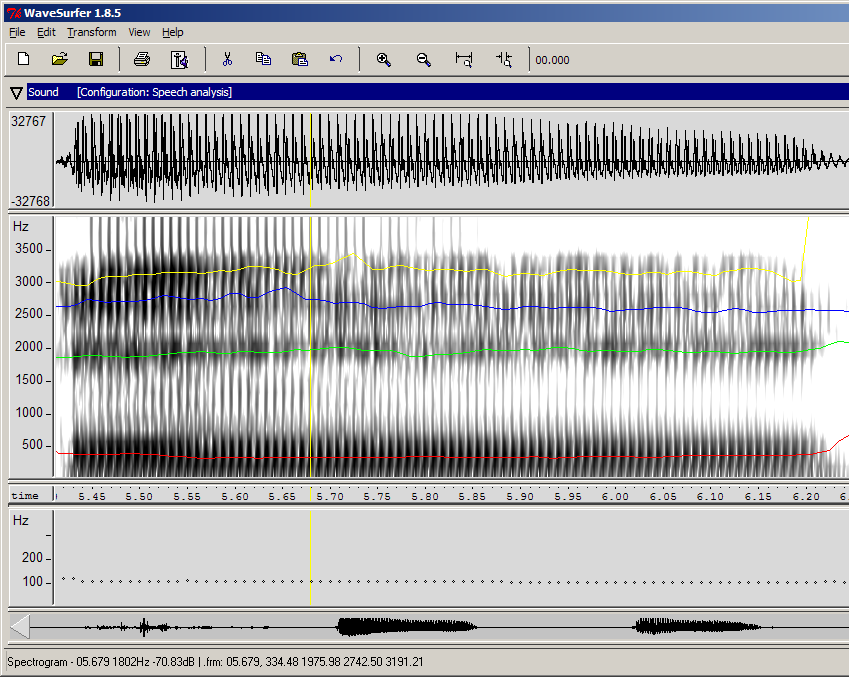
So, in this particular spectrogram, at this particular location of the cursor, F1 is 334 Hz, F2 is 1976 Hz. I'm saying [e] (listen), so these frequencies are more or less what we'd expect.
Chopping out what you don't need
Often a recording has unwanted pauses at the beginning or end, or between items. Select these pauses with the mouse and press Delete. Or select what you want and select Zoom to selection from the View menu.
Once you have the display looking nice you can save the configuration. Right-click on a panel, then select Save Configuration. It will save your settings , with a name of your choice, in a little file (on my Windows computer, the location of this file is C:\Documents and Settings\bhayes\.wavesurfer\1.8\configurations). When you start up Wavesurfer, you can right-click a panel, select Load Configuration, and then select your stored configuration.
You can follow the directions in the Wavesurfer manual for printing, but it involves downloading various other software and may not work. A "quick and dirty" alternative is to grab what's on the screen and print it in another program.
Windows
a. While in Wavesurfer, type Alt PrintScrn (this is an archaic key
on the computer keyboard hardly ever used any more, but very useful here!).
b. Open the Windows utility program called "Paint" (find it, if necessary,
by searching for "mspaint.exe") and select Edit, then Paste
(or, faster, Ctrl v) You'll then have a copy of your Wavesurfer
screen which you can edit with Paint and print.
c. Sometimes it's a good idea to use the Select tool in Paint to grab
just the bits of the Wavesurfer output that are most relevant and useful.
Select this material, then Copy it (Edit menu, or just
Ctrl C). Then File, New, Paste (Ctrl
v).
d. Once you've pasted into Paint, you can save the image, or you can type
Ctrl A ("Copy all"), go into your word processing program, and type Ctrl
V ("paste"). In many word processing programs, you can resize images to fit
the page.
Mac
The following is a lightly-edited version of information offered by two experienced Mac users.
To take a picture of the whole screen, the keyboard shortcut is: Cmd + Shift + 3.
When taking a screenshot on a mac that isn't the entire screen it self, you press Cmd+Shift+4. This will bring up a little cursor that looks like crosshairs. Place the cursor wherever you want to start your screen shot, then hold left click and drag. Once you have the area on the screen that you want, release the left click. This will save a .png file (Image file similar to a .jpg or .gif) to your desktop. You can then open this file and paste it into your document.
For more information, visit http://guides.macrumors.com/Taking_Screenshots_in_Mac_OS_X
More
There's more. Read the manual.
Setting Inputs and Volume Levels in Windows
Be sure your computer is set up to record from the microphone or line input, whichever one you happen to be using. To do this, right click on the little loudspeaker at lower right of screen, then Open volume controls, Options, Properties, Recording, Ok, check either Microphone or Line In, set recording level. Then close the Volume Control window. You may have to experiment to find a level that is loud enough but doesn't overload.
If there is no little loudspeaker at the lower right of your screen, open Windows Help and search on Volume Control.
The newest version of Wavesurfer will refuse to make a pitch track if you've produced a stereo recording. Fix this by right-clicking on the display, selecting Properties, then picking the Sound tab, then entering 1 in Set Number of Channels.